Small batch sauerkraut fermenting in a mason jar on a kitchen counter with a glass weight and fresh cabbage

Small-Batch Sauerkraut in a Mason Jar: The Complete Beginner’s Guide

Small batch sauerkraut fermenting in a mason jar on a kitchen counter with a glass weight and fresh cabbage

Sauerkraut is the easiest fermentation project there is — and most people overcomplicate it before they even start.

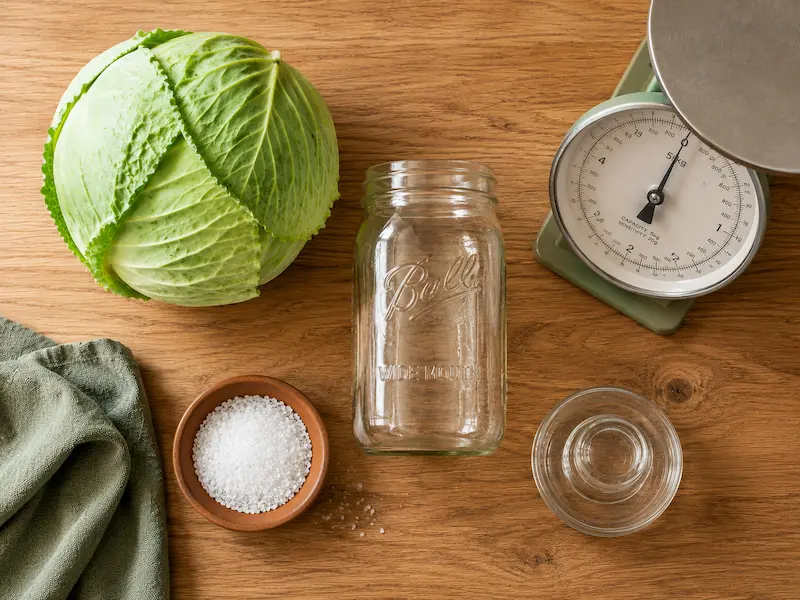
No crock. No specialist gear. No mysterious starter culture to keep alive. Sauerkraut needs exactly two ingredients — cabbage and salt — and one container. The bacteria that ferment it are already living on the cabbage leaves. Your only job is to create the right environment and stay out of the way.

This guide covers the whole process for a single quart mason jar — the right size to test the process in your apartment kitchen without committing to a five-gallon crock of kraut you may not finish.

  • What lacto-fermentation actually is and why it's safe
  • The exact salt ratio that keeps sauerkraut safe and crisp
  • What equipment you actually need — and what's optional
  • Step-by-step instructions for a single quart jar
  • How long to ferment and how to know it's ready
  • How to tell harmless kahm yeast from dangerous mold
  • Common mistakes and exactly how to fix them

What Is Sauerkraut, Really?

Sauerkraut is fermented cabbage — but the more useful way to think about it is this: it's cabbage preserved by its own bacteria.

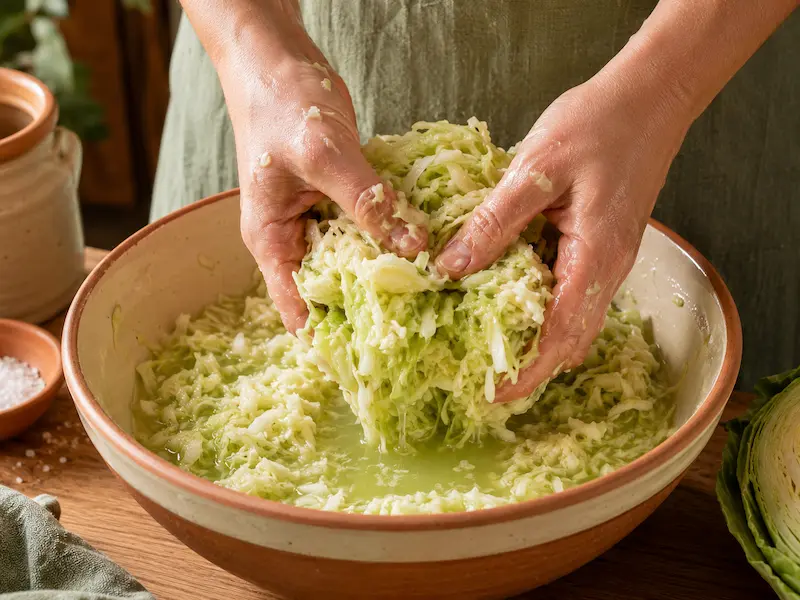
Cabbage leaves are naturally covered in lactic acid bacteria, or LAB. When you salt shredded cabbage, the salt draws water out of the plant cells through osmosis, creating a salty brine. That brine does two things at once — it creates an oxygen-poor environment that favours the LAB you want, and it suppresses the bad bacteria that would otherwise cause spoilage. As the LAB feed on the natural sugars in the cabbage, they produce lactic acid, which is what gives sauerkraut its tang and what makes it shelf-stable in the fridge for months.
This is the same family of fermentation behind kimchi, pickles, and yogurt — and it's been used to preserve vegetables safely for thousands of years before refrigeration existed.

On botulism, specifically: it's the question every beginner is quietly worried about, so it's worth answering directly. Botulism-causing bacteria cannot produce their toxin in an environment below pH 4.6, and a correctly salted vegetable ferment drops below that threshold within 48 to 72 hours. As long as you use the salt ratio below and keep the cabbage fully submerged, botulism is not a realistic risk in this process.

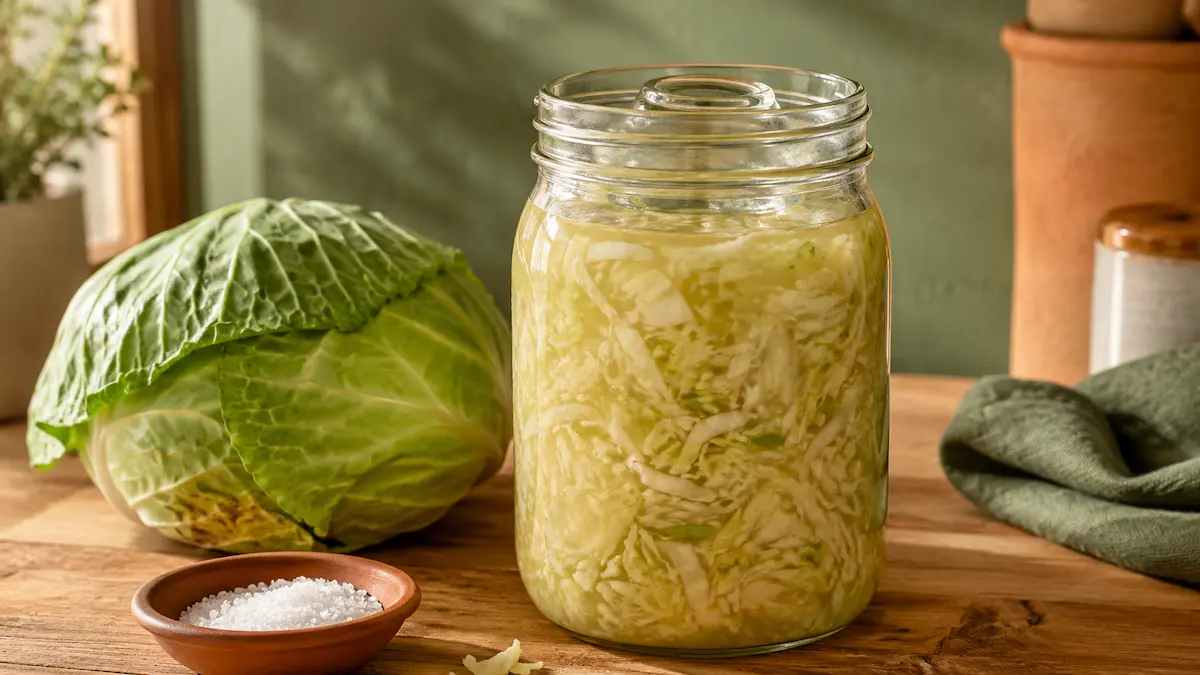
Why a Mason Jar Is the Best Way to Start

A single quart jar is the right entry point for apartment homesteading, for a few reasons.

  • No crock or cellar required — a quart jar fits on a kitchen counter or inside a cupboard with no special storage conditions
  • Low commitment — one head of cabbage makes roughly two quarts, so your first batch is small enough to course-correct on the next one
  • Easy to monitor — clear glass lets you watch the brine level and check for problems daily without opening the jar
  • Fully renter-friendly — no equipment installation, no odour if managed correctly, nothing that leaves a trace

What You'll Need

Sauerkraut fermentation equipment flat lay with cabbage, sea salt, mason jar, fermentation weight, and kitchen scale
  • 1 medium head of green cabbage (about 2 lbs / 900g) — the freshest cabbage you can find; older cabbage has weaker cell walls and ferments mushier
  • Non-iodized salt — sea salt, kosher salt, or pickling salt. Iodized table salt can inhibit fermentation and its anti-caking agents can cloud the brine
  • A kitchen scale — salt by weight, not by spoon. One tablespoon of fine table salt and one tablespoon of coarse kosher salt can differ by 50% in actual weight, so volume measurements aren't reliable
  • One wide-mouth quart (32oz) mason jar — wide mouth makes packing and cleaning dramatically easier than a standard jar
  • A fermentation weight — a glass fermentation weight, a smaller jar filled with water, or even a clean rock sealed in a food-safe bag. Its only job is to keep cabbage submerged below the brine
  • A way to release gas — either a standard canning lid you'll "burp" daily, or a specialty fermentation lid with a built-in airlock that vents on its own
  • A small bowl or plate — to sit the jar in, in case the brine bubbles over during the most active days of fermentation

Step-by-Step Instructions

Hands massaging salted cabbage to release brine for homemade sauerkraut
  1. Prep the cabbage. Remove the outer leaves and set one aside — you'll use it later. Quarter the cabbage, cut out the core, and shred the rest into thin strips, either with a knife or a food processor.
  2. Weigh and salt. Weigh your shredded cabbage, then calculate 2.25% to 2.5% of that weight in salt — for example, 900g of cabbage needs roughly 20g to 22g of salt, just under 1.5 tablespoons of kosher salt. Add the salt to the cabbage in a large bowl.
  3. Massage the cabbage. Using your hands, massage and squeeze the salted cabbage for 5 to 10 minutes until it visibly softens and releases enough liquid to pool in the bottom of the bowl. This liquid is your brine.
  4. Pack the jar. Working in handfuls, pack the cabbage tightly into your mason jar, pressing down firmly after each addition to remove air pockets. Pour in any remaining brine from the bowl. Leave about 1 to 2 inches of headspace at the top.
  5. Weight it down. Press your reserved cabbage leaf over the surface, then place your fermentation weight on top. Everything — cabbage and weight — needs to sit below the brine line. If the brine doesn't fully cover it, mix a small amount of 2.5% salt water (2.5g salt per 100ml water) and top it up.
  6. Seal and ferment. Close the jar — fingertip tight if using a regular lid, since you'll need to release gas daily, or sealed normally if using an airlock lid. Place the jar in a bowl on the counter, out of direct sunlight, somewhere between 65°F and 72°F (18°C–22°C) for the most reliable results.
  7. Burp daily if needed. If you're using a regular lid, open it slightly once a day to release built-up carbon dioxide, then reseal. Skip this step entirely if you're using an airlock lid.
  8. Taste test from day 4. Start tasting around day 4 and continue every day or two until the sauerkraut reaches the tang you want — typically 1 to 4 weeks depending on your room temperature.
  9. Move to the fridge. Once it tastes right, transfer the jar to the refrigerator. Fermentation slows dramatically in the cold, and the sauerkraut will keep for several months.

How Long Does It Actually Take?

Fermentation speed depends almost entirely on temperature. Warmer rooms ferment faster but can soften texture if they run too hot; cooler rooms take longer but tend to produce a crisper, more vitamin-rich result.

Room TemperatureFermentation TimeResult
60–65°F (16–18°C)5–6 weeksSlowest, but best colour, crunch, and vitamin C retention
65–70°F (18–21°C)2–3 weeksThe sweet spot most home fermenters aim for
70–75°F (21–24°C)1–2 weeksFastest safe range — taste daily to avoid over-souring
Above 75°F (24°C)Not recommendedTends to produce a soft, mushy texture
60–65°F (16–18°C)
Time5–6 weeks
ResultSlowest, but best colour, crunch, and vitamin C retention
65–70°F (18–21°C)
Time2–3 weeks
ResultThe sweet spot most home fermenters aim for
70–75°F (21–24°C)
Time1–2 weeks
ResultFastest safe range — taste daily to avoid over-souring
Above 75°F (24°C)
TimeNot recommended
ResultTends to produce a soft, mushy texture

Kahm Yeast vs. Mold — The One Safety Skill You Actually Need

This is the part that makes new fermenters nervous, and it's worth understanding properly rather than panicking the first time you see something on the surface.

Kahm yeast is a harmless wild yeast that can form when the surface of your ferment is exposed to oxygen. It looks like a thin, flat, white-to-cream film — sometimes with a slightly web-like or wrinkled texture — that spreads across the whole surface. It does not grow below the brine line. It's not dangerous, though it can give the kraut a slightly off, cheesy flavour if left too long. If you see it, simply skim it off the surface and continue fermenting or move the jar straight to the fridge.

Mold is a different situation entirely, and it means the batch should be discarded. Mold looks fuzzy or hairy, has visible three-dimensional texture, and can appear in white, green, black, blue, or other colours. Unlike kahm yeast, mold sends root-like structures below the surface that you can't see or scrape away — so removing the visible patch doesn't make the rest of the jar safe.

One color deserves special attention: pink or reddish discoloration. This is not a normal part of fermentation. It can indicate contamination by a bacterium called Serratia marcescens, which is not safe to eat around — particularly for young children, older adults, or anyone with a weakened immune system. If you see any pink or red tint in the brine or on the cabbage (and you're not working with red cabbage to begin with), discard the batch.

The simplest rule covers all of it: trust your senses. A healthy ferment smells pleasantly sour and tangy, almost sharp. A spoiled one smells musty, rotten, or like a damp cellar — that off smell is the clearest warning sign you'll get. When in doubt, throw it out.

Common Troubleshooting

My sauerkraut turned mushy instead of crunchy. This almost always comes down to temperature or salt. Fermenting above 75°F softens texture quickly, and too little salt has the same effect. For your next batch, ferment somewhere cooler, weigh your salt on a scale rather than estimating, and consider tucking a grape leaf, oak leaf, or horseradish leaf into the jar — the tannins in these leaves help preserve crispness.

It tastes too salty. Salt measured by volume varies wildly between brands, so recalculate by weight next time. In the meantime, a quick rinse before serving cuts the saltiness without affecting the fermentation that already happened.

I don't see any bubbles — did it fail? Not necessarily. Visible bubbling depends on how tightly your lid is sealed and how easily gas escapes, and it also slows considerably in cooler rooms. The real test is taste, not bubbles — start tasting around day 5 to 7. If it's getting noticeably tangy, fermentation is working even without a single bubble in sight.

The cabbage keeps floating above the brine. This is the single most common cause of kahm yeast and mold, since exposed cabbage is directly exposed to oxygen. Check your weight is heavy enough and fully submerged, press the cabbage down again, and top up with a small batch of 2.5% salt water if the brine level has dropped.

Flavor Variations to Try Once You've Got the Basics Down

  • Caraway seeds — the classic German-style addition, 1 to 2 teaspoons per quart
  • Juniper berries — earthy and slightly piney, pairs well with caraway
  • Sliced apple — adds natural sweetness that balances the tang
  • Fresh ginger — a few thin slices add warmth and a subtle kick
  • Red cabbage — same process, same salt ratio, dramatically different colour and a slightly faster ferment due to higher natural sugar content

Frequently Asked Questions

Is homemade sauerkraut actually safe to make at home?

Yes. Lacto-fermentation is one of the oldest and most well-understood food preservation methods, and it's inherently self-protecting — the salt and the lactic acid the bacteria produce both work against the kind of bacteria that cause illness. The bacterium responsible for botulism cannot produce its toxin above a pH of 4.6, and a correctly salted ferment drops below that threshold within 48 to 72 hours. As long as you use the correct salt ratio, keep the cabbage fully submerged below the brine, and know how to recognise mold versus harmless kahm yeast, the process is very safe.

Do I need an airlock lid, or will a regular jar lid work?

A regular canning lid works perfectly well — you'll just need to "burp" it once a day by loosening the lid slightly to release built-up gas, then resealing it. An airlock lid is a convenience upgrade, not a requirement; it vents gas automatically so you don't have to remember the daily burp.

How long does finished sauerkraut last in the fridge?

Properly fermented sauerkraut, stored in the fridge with the cabbage kept submerged in its brine, typically lasts 6 to 12 months or longer. It will continue to slowly ferment and become more sour over time, but the flavour change happens gradually in cold storage.

Why isn't my sauerkraut bubbling?

Visible bubbling isn't a reliable indicator either way — it depends on how tightly your jar is sealed and how easily gas escapes. The better test is taste. Start tasting around day 5 to 7; if the flavour is developing a noticeable tang, fermentation is happening even without visible bubbles.

Can I add other vegetables or use red cabbage instead?

Yes. Red cabbage ferments using the exact same salt ratio and process, just with a faster timeline and a striking purple colour. Carrots, beets, and apple all work well mixed in with green or red cabbage — keep the total vegetable weight the same when calculating your salt percentage.

What should I do if I see white film on top of my sauerkraut?

In most cases this is kahm yeast — a harmless wild yeast that forms a thin, flat film when the surface is exposed to oxygen. Skim it off and either continue fermenting or move the jar to the fridge. If the growth is fuzzy, three-dimensional, or coloured (especially pink or red), that's a different situation — discard the batch rather than trying to save it.

Final Thoughts

Sauerkraut is the project that turns "I'd like to try fermenting someday" into "I actually ferment things now." It needs almost nothing — a cabbage, some salt, a jar you probably already own — and it teaches you the core skill every other ferment builds on: salt ratios, submersion, and reading what your jar is telling you.

Your first batch won't be perfect, and that's fine. The cabbage core and outer leaves you trim off don't have to go to waste either — they're perfect material for your next compost batch.

🥬

New to apartment homesteading? Read our complete Apartment Homesteading Guide to see how fermentation fits into the bigger picture.

🍎

Already hooked on fermentation? Try our guide to Apple Cider Vinegar from Scraps — another zero-waste ferment that costs almost nothing to start.

🪱

Don't waste those cabbage trimmings. Read our guide to How to Compost in an Apartment Without the Smell and put every scrap to use.

Similar Posts

Leave a Reply

Your email address will not be published. Required fields are marked *